Introduction to Healing Balms
Healing balms have become a staple in many American households, especially for those who appreciate natural wellness and DIY remedies. But what exactly are healing balms, and why are so many people choosing to make their own at home? In this section, we’ll explore the basics of healing balms, their benefits, and why crafting them yourself can be both rewarding and budget-friendly.
What Are Healing Balms?
Healing balms are topical ointments made from a blend of nourishing oils, waxes, and herbal extracts. They’re designed to soothe, protect, and help heal the skin. Unlike store-bought creams filled with synthetic ingredients, homemade healing balms allow you to control every ingredient that goes into your product.
Common Uses for Healing Balms
| Use | Description |
|---|---|
| Lip Care | Moisturizes dry or chapped lips |
| Minor Cuts & Scrapes | Soothes and helps speed up skin recovery |
| Dry Skin Patches | Nourishes rough elbows, knees, and heels |
| Tattoo Aftercare | Protects new tattoos during the healing process |
| Cuts & Bug Bites | Reduces itching and inflammation |
Benefits of Making Your Own Healing Balm
- Ingredient Control: You choose only what’s best for your skin—no harsh chemicals or artificial fragrances.
- Customization: Tailor your balm with essential oils and herbs that fit your personal needs or favorite scents.
- Cost-Effective: Homemade balms often cost less in the long run compared to store-bought options.
- Sustainability: Reduce packaging waste by reusing containers and opting for eco-friendly materials.
- Empowerment: There’s a sense of accomplishment in creating something beneficial for you and your family with your own hands.
Why Americans Love DIY Healing Balms
The rise of natural living trends across the U.S. has sparked a renewed interest in DIY skincare. Making healing balms at home fits perfectly with values like self-sufficiency, sustainability, and wellness. Plus, it’s an enjoyable activity you can do solo or as a fun project with friends or kids.
2. Essential Ingredients and Tools
Before you dive into making your own healing balms, its important to gather the right ingredients and tools. In the United States, many people prefer using locally sourced, natural ingredients to ensure their balms are both effective and environmentally friendly. Here’s what you’ll need to get started:
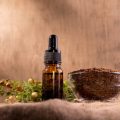
Popular Ingredients in American DIY Balms
Most homemade balms use a blend of plant-based oils, beeswax, and soothing herbs. These ingredients are not only gentle on the skin but also easy to find at local health stores or farmers markets. Check out the table below for a quick overview:
| Ingredient | Common Uses | Why Americans Love It |
|---|---|---|
| Coconut Oil | Moisturizer, base oil | Naturally antibacterial, widely available |
| Olive Oil | Base oil, soothing dry skin | Mild, rich in antioxidants |
| Beeswax (local) | Thickens balm, creates protective barrier | Supports local beekeepers, natural scent |
| Shea Butter | Adds creaminess, nourishes skin | Sourced from African shea nuts, deeply moisturizing |
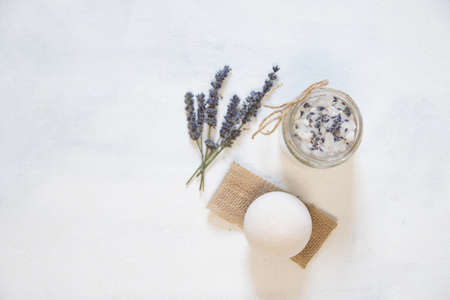
| Dried Lavender or Calendula Flowers | Soothing scent, calms irritated skin | Easily grown in home gardens, relaxing aroma |
| Peppermint or Tea Tree Essential Oil | Adds fragrance, cooling effect (peppermint), antimicrobial (tea tree) | Popular for their fresh scents and benefits |
Basic Equipment You’ll Need
You don’t need fancy gadgets to make healing balms at home. Most of these tools can already be found in your kitchen:
- Double boiler or heat-safe bowl & saucepan: For gently melting oils and beeswax together.
- Measuring cups and spoons: To get your ratios just right.
- Mixing spoon or spatula: For stirring your mixture.
- Fine mesh strainer or cheesecloth: To strain out herbs after infusing oils.
- Tins or small glass jars: For storing your finished balm.
- Labels: Handy for remembering which balm is which!
A Few Tips Before You Begin
If you’re new to DIY skincare, start with smaller batches so you can test what works best for your skin. Always choose high-quality, organic ingredients when possible—your skin will thank you!

3. Step-by-Step Balm-Making Process
If you’re ready to dive into the world of homemade healing balms, you’ll be surprised at how simple and rewarding the process can be. Let’s walk through each step so you can start creating your own personalized balms right in your kitchen.
Gather Your Ingredients and Tools
Before you begin, make sure you have everything you need on hand. Here’s a quick checklist:
| Ingredient/Tool | Purpose |
|---|---|
| Beeswax pellets or candelilla wax (for vegan option) | Gives structure and firmness to your balm |
| Carrier oil (like coconut, jojoba, or olive oil) | Nourishes skin and helps blend ingredients |
| Essential oils (such as lavender, peppermint, tea tree) | Adds scent and therapeutic benefits |
| Double boiler or heatproof bowl over pot of water | For gently melting wax and oils together |
| Small containers or tins | For storing your finished balm |
| Spoon or spatula | For mixing ingredients |
| Dropper (optional) | For adding essential oils precisely |
Melt the Wax and Carrier Oil
Add your beeswax and carrier oil to the top of a double boiler. Gently heat over low to medium heat, stirring occasionally until everything is fully melted and combined. This usually takes just a few minutes.
Recommended Ratio for a Basic Balm:
| Beeswax | Carrier Oil |
|---|---|
| 1 part (ex: 1 oz) | 4 parts (ex: 4 oz) |
This ratio creates a firm but spreadable balm. Adjust if you want a softer or harder texture.
Add Essential Oils for Scent and Benefits
Once the mixture is melted and removed from heat, add your chosen essential oils. Stir well to combine. For safety, use about 10-20 drops of essential oil per ounce of carrier oil. Start with less—you can always add more!
Popular Essential Oil Combos:
| Purpose | Oils to Try |
|---|---|
| Soothe skin irritation | Lavender + chamomile |
| Cools aches & pains | Peppermint + eucalyptus |
| Nourish dry skin | Frankincense + geranium |
Pour Into Containers and Let Set
Carefully pour your warm liquid balm into clean, dry tins or jars. Allow them to cool undisturbed at room temperature until they solidify—this usually takes about 30-60 minutes. Once set, pop on the lids and label your creations.
Pro Tips for Success:
- If your balm is too hard, remelt and add more carrier oil.
- If it’s too soft, remelt with a little extra beeswax.
- Add dried herbs or flower petals for a pretty touch—but strain them out before pouring if you prefer a smooth finish.
You’ve now created your very own custom healing balms! Enjoy experimenting with different scents, textures, and benefits tailored just for you.
4. Popular Recipe Ideas
Ready to get creative with your own healing balms? Here are a few classic American favorites you can try at home. These recipes are simple, use easy-to-find ingredients, and are perfect for beginners and DIY pros alike.
Calming Lavender Balm
This soothing balm is great for winding down after a long day. Lavender is loved in the U.S. for its relaxing scent and gentle skin benefits.
Ingredients:
| Ingredient | Amount |
|---|---|
| Beeswax pellets | 2 tablespoons |
| Coconut oil | 3 tablespoons |
| Shea butter | 1 tablespoon |
| Lavender essential oil | 10 drops |
Directions:
- Melt beeswax, coconut oil, and shea butter together using a double boiler or microwave (in short bursts).
- Once melted, remove from heat and stir in lavender essential oil.
- Pour into a clean container and let cool until solid.
- Apply to wrists, temples, or anywhere you need a little calm.
Arnica Muscle Rub
This balm is a popular pick among athletes and anyone with tired muscles. Arnica is known in America for its natural soothing properties.
Ingredients:
| Ingredient | Amount |
|---|---|
| Beeswax pellets | 2 tablespoons |
| Olive oil (infused with arnica flowers if possible) | 4 tablespoons |
| Eucalyptus essential oil | 8 drops |
| Peppermint essential oil | 6 drops |
Directions:
- Melt beeswax and olive oil together gently.
- Add eucalyptus and peppermint essential oils once removed from heat.
- Pour into a jar or tin and let it set up.
- Massage onto sore muscles as needed.
Peppermint Foot Soother
Peppermint provides a cool, tingling relief thats just right for tired feet after a busy day—something many Americans enjoy using after work or exercise.
Ingredients:
| Ingredient | Amount |
|---|---|
| Cocoa butter | 2 tablespoons |
| Coconut oil | 2 tablespoons |
| Peppermint essential oil | 12 drops |
| (Optional) Tea tree essential oil | 5 drops |
Directions:
- Melt cocoa butter and coconut oil together.
- Add peppermint (and tea tree, if using) oils after removing from heat.
- Spoon into a small tin or jar and allow to cool fully before use.
- Smooth onto feet at bedtime or after activity for instant refreshment.
You can mix and match these ingredients to make your own favorite combinations! All these recipes use natural ingredients commonly found in American homes or at local health stores, making them easy to personalize for your needs.
5. Tips for Storage, Use, and Gifting
Once you’ve finished crafting your homemade healing balms, it’s important to store them properly, use them safely, and share them in creative ways. Here are some easy-to-follow tips to make the most of your DIY creations.
How to Store Your Healing Balms
Proper storage keeps your balms fresh and effective for as long as possible. Here’s a quick guide:
| Container Type | Best Location | Shelf Life |
|---|---|---|
| Tin or Glass Jar | Cool, dark place (like a cabinet) | 6-12 months |
| Plastic Container | Away from direct sunlight | Up to 6 months |
| Lip Balm Tube | Purse or backpack (room temp) | 3-6 months |
Pro tip: Always label your balms with the ingredients and date made!
Safe Usage Tips for Your Balms
- Do a patch test: Dab a small amount on your inner arm and wait 24 hours to check for irritation.
- Avoid using balms on broken skin unless the recipe is specifically designed for wounds.
- Keep away from eyes and mucous membranes.
- If you experience redness, itching, or discomfort, discontinue use immediately.
- Store out of reach of children and pets.
Creative Ways to Gift Your Homemade Balms
Your handmade balms make thoughtful gifts for friends and family! Here are some fun ideas:
- Mason Jar Gift Set: Place several small balms in a mason jar, tie with twine, and add a handwritten tag.
- Themed Gift Baskets: Pair your balm with other self-care items like herbal teas, bath salts, or candles.
- Personalized Labels: Print custom labels with the recipient’s name or a special message.
- Holiday Favors: Decorate tins with festive stickers or ribbons for Christmas, birthdays, or Mother’s Day.
- Party Favors: Give mini balms as unique thank-you gifts at showers or gatherings.
With these tips, you can keep your healing balms fresh, use them safely, and spread a little homemade happiness to those you care about most!